Billing
This page provides the option to customize the payment settings for your instance. By configuring Stripe as the payment gateway, inputting your payment information, and enabling the purchase button for your courses, you can easily manage your payment process.
To set up your payment gateway, edSPIRIT requires the following information “from your Stripe account”:
- Secret key
- Publishable key
- Webhook Signing secret
You can locate the secret and publishable keys by accessing the Stripe dashboard, navigating to Developers, and selecting API keys.
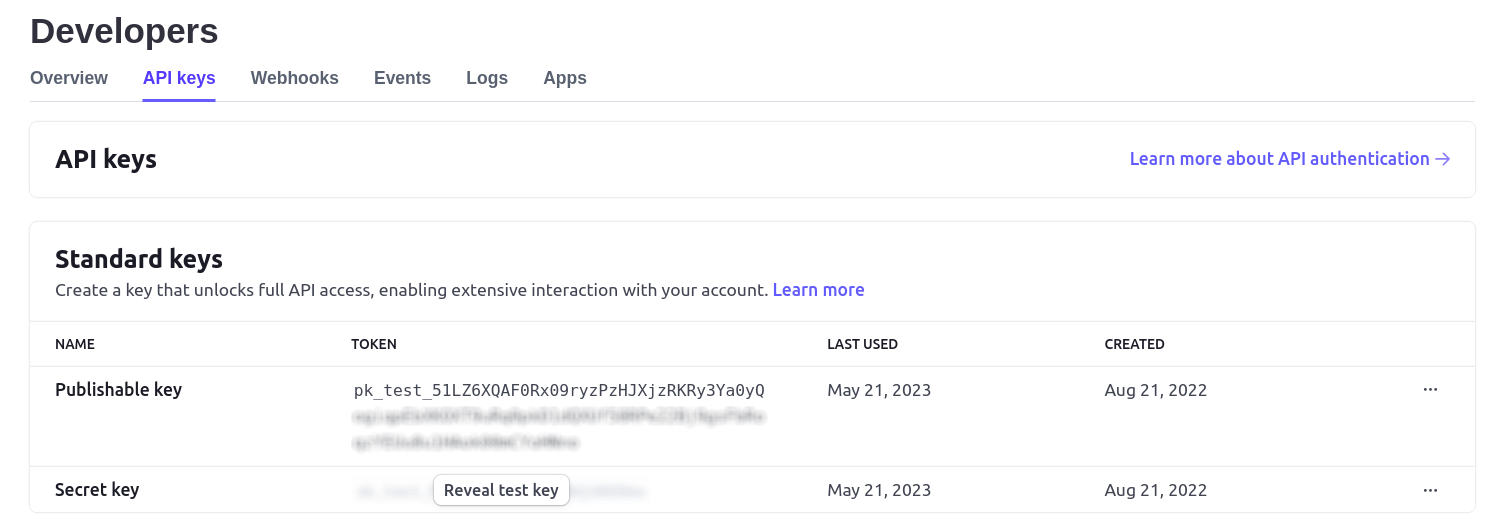
The Secret Key is of utmost importance and should not be shared with anyone to safeguard the security of your payment gateway.
For the Webhook Signing secret, first, you need to create a new webhook. Within your Dashboard, go to Developers, then Webhooks, and click on Add endpoint.

Assuming your organization's address is example.edspirit.com, set the following URL as your Endpoint URL:
Next, click on the Select Event button, and search for the checkout.session.completed event. Once located, select it and click on Add Events.

Once you have provided the necessary information and configuration settings, you can finalize the webhook creation process by clicking on Add endpoint.

After saving the webhook, a new webhook page will be displayed. Within this page, you will find the Signing secret. To view or copy it, click on Reveal.

Great! Now that you have obtained all the required values to configure your payment gateway, follow these steps:
1. Access the Admin Console by navigating to Admin Console > Configuration > Billing.2. Choose your desired currency unit from the available options.3. Insert the publishable, secret, and webhook signing secret keys into the respective fields.4. Save the configuration settings.
By completing these steps, your payment gateway will be successfully set up with the provided keys and settings.

Please keep in mind that once the payment gateway settings are saved, it won't be possible to make changes to the currency.
Congratulations! You have now successfully configured your payment gateway for your instance.
However, if you had previously set up the webhook and have recently changed your domain to an external domain, it is necessary to update the Endpoint URL for that specific webhook to ensure proper functionality.
To set the price for a course, follow these steps:
1. Access the Admin Console and navigate to Management > Courses.2. Locate the desired course from the list and click on the management option next to it to access the Commerce settings.
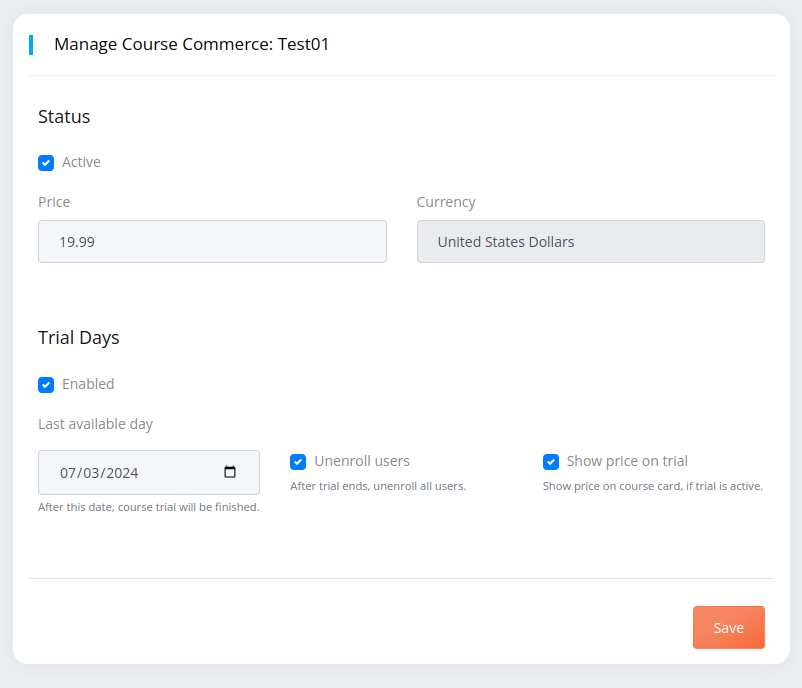
To make a course available for purchase, you need to activate it and assign a price. Additionally, you have the option to enable Trial days, which allows users to enroll and access the course for a specified time without being charged. This allows them to try the course for free.
To accomplish this, follow these steps:
1. Ensure that the course is set to an active status.2. Specify a price for the course.3. Optionally, enable Trial days to allow users to enroll and utilize the course without any charges during the specified trial period.
In conclusion, this documentation has guided you through the process of configuring the payment settings for your instance. By setting up Stripe as your payment gateway, entering the necessary information such as the secret and publishable keys, and creating a webhook with the appropriate endpoint URL, you can seamlessly manage payments for your courses.
Furthermore, the documentation emphasized the importance of safeguarding the Secret Key and not sharing it with anyone. It also provided instructions for setting the currency unit, enabling trial days for courses, and making courses purchasable.
By completing these steps, you have achieved the successful setup of your payment gateway and are now ready to accept payments and offer courses to your customers. Remember to regularly review and update your payment settings to ensure a smooth and efficient transaction process.
Related Articles
Cancelling Your Subscription
You can easily cancel your subscription before your billing cycle and continue to enjoy the product until the end of the cycle. Once you cancel, and at the end of the billing cycle, your credit card may only be charged for any owing fees due to ...Dashboard Overview
The dashboard presents a report of the usual activities performed in the system, such as number of active users, total number of users, number of course creator requests, number of training courses created, and status (general information) of the ...Managing Users and Permissions
All users who register in different departments of the organization can be seen in the Users section and the settings related to people's access can be found here. The report of users' activities can also be seen in this section in addition to ...